Showing posts with label sewing. Show all posts

Tuesday, January 31, 2012

felt storage boxes


Have an affinity with felt? Me too. I wanted a couple of new soft storage pieces for my little girls room. The most difficult part of this tutorial is finding thick enough felt yardage that isn't ridiculous expensive.
The measurements of my box is 10" width x 14" depth x 8 3/4" height. My felt is about 3mm thick. 5mm would be even more stable.


Cut out your pattern. I added a cut out oval handle on the ends for more simple carrying.

Pin your corners together and do a simple straight stitch 1/4" from the edge. Do all 4 corners.

A couple of sources the felt people. You will have to call for pricing and availability.
Filz felt. It is 100% wool which equals more expensive.
Polyester felt is less expensive, it is just hard to find. Another option is to get craft felt and use a spray adhesive to layer and make it however thick you want it to be.

Thursday, January 26, 2012

simple color block skirt

Making skirts for your little girl has to be about the easiest sewing jobs in the world, and I will prove it with this one. Only a couple measurements, some ironing and 4 stitches are required.


Fabrics:
I used a corduroy. I bought 12" of a light gray and 6" of a purple-berry color. They were on clearance and cost me $1.21 all together.

First measure your little girls waist. (I will use my little girls measurements for as an example, she is 18 months old).
Her waist measured 17", I will add 1" for seam allowances. Double that and you have your width measurement. (you can go even bigger for more fullness) I needed 36" in width and I measured from her waist down for how long I wanted it to be. I wanted it to be 9" in total length. I decided to make the top panel or color 6" and the bottom panel/color 3".

Putting right sides of fabric together, I sewed my two pieces of fabric together before I cut anything. If you have a serger, serge the two fabrics. Next measure your width and cut the fabric to that width, again, mine was 36".
*note* if you need a wider width than the width your fabric came in, then do two pieces and your skirt will have 2 side seams instead of one back seam.

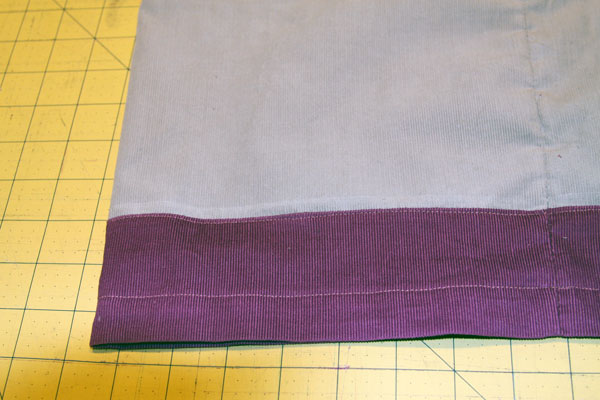
Next you will want to iron your bottom panel. I wanted mine to be 3" and I wanted a 1" stitch line along the bottom. Here is the math 3"+1" for stitch length and 1/2" for the turn=4 1/2". I ironed the fabric at 1/2" first and then ironed it again at 1" for where there would be the 1" stitch line.
(image above shows the ironing)

Sew the side seams.

Now that your side seam is sewn, you can fold the bottom panel back up with to where you already have it ironed and stitch it at your 1" mark.


You will basically do the same thing with the top panel to insert an elastic and finish the skirt.

Again, I wanted a 1" waist line. The math, 6"+1"+1/2"=7 1/2". Iron the 1/2", then 1".

Stitch almost all the way around leaving just enough room to insert the 18" elastic. (base your elastic length on your waist measurement +1") Attach your elastic to a safety pin and thread through your waistband. Stitch the two ends of the elastic together, pull the elastic taut through the waistband and sew up that little opening and viola! You have a new little skirt!

Monday, May 16, 2011

Sewing Tutorial Site


Although there are no posts being added to weekend designer, the library of sewing tutorials is worth browsing to find projects like the above pictured Oscar De La Renta tiered gown. Isn't it lovely?

Also be sure to check out the bloggers new site bag'n-telle focusing on bags and accessories. The bag above is my favorite tutorial on the bag'n-telle site.

happy sewing!