
 Love these pretty pillows from West Elm? I do too. Here is
 a fun project to make your own versions of these pillows.
* * * *
Start with choosing the two colors you pillow is going to be. I
wanted a gray and white version. I recommend using a polyester
and cotton blend broadcloth for better wear.
The fabrics I used were 44" wide, so I had the fabric cutter
at the store cut my fabric to 62"
 Start by cutting your fabric at 3" wide pieces. Cut the length
of the fabric. So you have pieces that are 3" by 62". Do this
with both colors of your fabric.
 I now have 14 strips of each color fabric.
 Take one of each color strip and line them up at the sides. Sew them with
a 5/8" seam allowance on a 2.5 stitch length. Do this with all 14 pieces.
 Press open the fabric strips, ironing your seams to one side of
your stitch line.
 Now fold your fabric over and iron so that you have a nice crisp and clean edge.
 Start to create ruffles by folding you fabric over itself and set
with a pin. There is no right or wrong on length. I did min so
that they are about 9" from end to end of the ruffles.
I also made them 1/2" deep, that is the white peeks out about 1/2".
Again, this is your customized pillow, so if you want there to
be more of the contrast color peeking out, then go ahead and
make them deeper!
 Start to adjust where you are starting your ruffles to create
different dimensions or steps to your ruffles. Don't worry about
making them look perfect. In the end a little bit of inconsistency
gives the pillow more character.
 I cut out 4 pieces of white fabric at 18" by 18". The size of my
finished pillow is going to be about 16" by 16". I cut 4 pieces
because I am going to be using the stuffing from an old pillow. If
you use a pillow form instead, you could get away with just 2 cuts.
However, doubling up the fabric gives more stability
to sew the ruffles to.
Start marking lines on the pieces that you are sewing the ruffles to.
I started 2 1/2" from the bottom.
 Next make lines all the way up the fabric 2" apart. These are your
guidelines to line the edges of of your raw edge ruffles to.
*NOTE*
You can create more overlap if you want. On my pillow, if you lift
up one of the ruffles of my pillow, you can see the raw edges.
I did this to conserve fabric usage. If you want a more
finished look, you will want to make your fabric strips longer.
5" strips would do for overlap when stitching on to hide the
raw edges.
 Starting with your bottom ruffle, line it up along your bottom mark
and stitch with a 5/8" seam allowance.
 *NOTE*
If you made your ruffles deeper, you will need to adjust how deep
you will need to adjust your seam allowance to catch your pleating.
 Work your way up the pillow. you will have extra fabric trailing off
the white fabric.
 Continue all the way to the top.
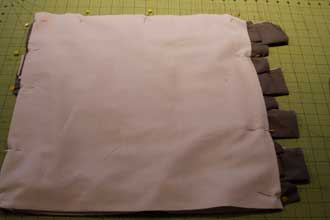 Now with you ruffles face up, place your other pillow fabric
cuts on top, line them up to the squares that have the ruffles
stitches to them and pin along 3 sides to secure for stitching.
 Before sewing the edges, make sure that you bottom ruffle will not
get caught in your bottom seam. If it helps, you can pin it up like
this picture to keep it out of your way.
Sew the along the sides and across the top with a 1/2" seam allowance.
Along the bottom seam, only sew in about 1 1/2"-2" so that you
have room to put your pillow form or stuffing into the pillow
it is turned right side out.
 Now that your seams are sewn, trim the extra trailing fabric
along the edges.
 Trim all four corners and then turn your pillow right side out.
 Fill you pillow with the stuffing or pillow form.
 Finish off bottom edge with a blind stitch.
 Here is what the finished product looks like. The picture above
it is what the pillow I used the stuffing from looked like. It was
a hand-me-down. I would say it is a BIG improvement!
love the pillow! when are you gonna make me one?
ReplyDelete